Need a quick reference?
Have you already read this laborious tutorial and you just need to get a refresher on commands? Here are the few things that we need to know – but please read on for some major caveats about the very narrow, simple-minded way that we use Git and Github.
I just want to make some changes and push those changes to my Github repo
Here's the pattern: add, then commit, then push
# Just add every change that is currently untracked in the repo
$ git add --all
# Make those changes part of the repo, no matter how boring
$ git commit -m 'whatev'
# Just push those changes to the "origin"
$ git push
# IF you're asked about specifying a default branch, do:
# git push -u origin master
And occasionally check your repo as it lives on Github to make sure it has what you want.
How to create a new Git repository from one of your computer's existing file folders?
I'll pretend you have a folder named foobar located at this path: /Users/thatsme/Downloads/foobar
-
Navigate to that directory so that you can run commands via the shell. The easiest way is to just pop open Terminal and
cdinto it:$ cd /Users/thatsme/Downloads/foobar -
Once you're in the folder that you want to turn into a repo (run the
pwdcommmand to make sure), then run:$ git init
You should receive a response of:
Initialized empty Git repository in /Users/thatsme/Downloads/foobar/.git/
Running git init basically means creating that hidden .git subfolder, which you should never have to inspect manually.
I forgot the state of my Git repo
Nothing wrong with using the git status command just for the fun of it. Even if you do it in a directory that is not a git repository, you just get this message:
$ git status
fatal: Not a git repository (or any of the parent directories): .git
It just means, "Hey, there's no .git/ directory in the current directory"
If you run git status in an actual git repository, you'll get information on whether any changes have been made that aren't yet tracked (i.e. need to be added). Or, if there are tracked changes that need to be committed.
How do I add changes to a single file to be tracked?
$ git add somefile.txt
How do I just add all changes that could possibly have been made?
$ git add --all
How do I delete a file from the repository?
This is a tough question. Is the file in question a file that you no longer need, ever? Then just delete it, and use git add – remember that add refers to adding changes of all types, including deletions:
$ git add somedeadfile.txt
When you then make a git commit action, the file will be noted as deleted
$ git commit -m 'bye file'
[master 997a697] bye file
 1 file changed, 0 insertions(+), 0 deletions(-)
 delete mode 100644 somedeadfile.txt
What if it's a file that you accidentally added – but you haven't yet committed? Or that you've committed (and/or pushed), but you want wiped out from the history of the repo? If you're in my class, just email me as soon as possible.
Major caveats
The brief lessons and tips in this guide assume you aren't doing anything beyond using Github in a very predictable, personable fashion that is barely removed from just making changes to a file folder:
- You are the sole contributor to the repo.
- You want to make new branches and compartmentalize your work, rather that constantly changing the "master" version of the repo.
- You aren't doing making/pushing changes via your personal computer and via the Github interface.
- There are only two copies of the repo: on your computer and on Github, respectively.
- You aren't planning to revert changes in any complicated way.
- You aren't using any of Github's special social features, such as "forking" and making/accepting "pull requests"
Basically, I don't get into the fun of merge conflicts, the kind of thing that happens naturally when more than one person is changing things in a repo. It's usually no big deal. But I'll deal with those in another guide.
A bit about Git and Github
Some ramblings about Git and Github. I'll have better metaphors and analogies at some point.
Git: A fancy way of keeping track of files in a folder
It's easy to conflate Git and Github, but there is a difference: Git is software that efficiently keeps track of every change to a file that you want to keep track of. This is its version control functionality – instead of creating endless, manual backups of an important file – e.g. THESIS-ALMOST-FINAL.DOC, THESIS-MORE-FINAL.DOC, BACKUP-THESIS-BEFORE-MAKING-IT-MORE-FINAL.doc – the Git program – on command – will note the content and exact timestamp of changes that have made between commits of a file/file directory. Reverting back is painless.
Github: A place to share your Git repositories
One of Git's strongest selling points is its distributed nature: multiple people can have clones of the same Git repository and, more or less, make additions, changes, deletions in a very ordered fashion. Github.com takes advantage of Git's features and provides a convenient place to host Git repositories.
Why are there so many roads to using Git and Github?
The nuances between just using Git and/or using Git with Github aren't particularly important to us. But the fact that they are two different things means that these two things should not be a surprise to us:
- It's possible to have Git installed on your computer and to use it without ever logging on to Github, just like it's possible to have friends without going on to Facebook.
- It's possible to create a Github account without having Git properly installed on your computer, just like you can sign up for Facebook without having any friends.
Do you have Git installed on your computer?
This is probably the most nebulous thing for me. I have my computer set up with the tools and conveniences common to professional developers. I don't think I can remember when I actually installed Git – it's just there, and it just works.
However, if you're new to development, then installing Git was likely never a priority. Maybe your system is new enough that it comes with Git. Or maybe it's old enough that the incantations on my system won't work on yours. In any case, here's an easy way to see if Git is even installed.
Go to your system's command line, then run the following command:
$ git --version
(don't include the $ – I use that to indicate that the command is to be run at the shell, whether you're on OSX/Linux or Windows)
Hopefully the output of that command will look similar to this (i.e. your system's Git is version 2.x or better, in the year 2016):
git version 2.6.4
Let's get started
One of the charms of Git and its distributed mindset – that a repository can start from anywhere, and then be cloned and contributed to by anyone across the world – can be confusing when you first start. Because it means that there are several starting points to get to the same destination.
For the purposes of this guide, I will assume:
- You have your own computer
- On this computer, you have a file folder named
compciv-2016that you wish to turn into a Github repository -
And while it doesn't matter exactly where
compciv-2016/exists in your folder structure, let's just assume that it is on your Desktop, i.e. for OS X:Users/ |__ your_username_on_ur_computer/ |_ Desktop/ |___ compciv-2016/
- You should also by now have created a Github account. If your username is "some_name", then your Github homepage is: https://github.com/some_name
- You eventually want to connect your local Git repository, i.e.
~/Desktop/compciv-2016with a repository created on Github, i.e. athttps://github.com/some_name/compciv-2016
So, we'll start with the Git only steps, then move to Github.
Turning a file folder into a Git repository
For our purposes, we can think of a Git repository as just a file folder with special powers, including an efficient, seamless process for tracking every change we ever make to that folder.
Let's be clear on this: the first step of turning a file folder into a git repository has nothing to do with Github. Git is software that any computer can use. Github is a web service. We can do things with Git without being logged into Github or even onto the Internet.
OK, onwards with just Git:
Creating a Git repository
First, open the Terminal and change into the target directory, i.e. the file folder that we intend to turn into a Git repository. Assuming it is ~/Desktop/compciv-2016 and you're on an OSX/Linux system, here's how to change into that directory:
$ cd ~/Desktop/compciv-2016
Note: It is especially important that you're in the correct directory before going further. Creating a git repo in a directory where you weren't expecting to be is going to cause a lot of confusion.
Always double-check where you are with the pwd (print working directory) command:
$ pwd
/Users/your_computer_username/Desktop/compciv-2016
The command to create a Git repo in the current folder is simply:
$ git init
The result of that command should be something like this (except your name instead of dan of course):
Initialized empty Git repository in /Users/dan/Desktop/compciv-2016/.git/
What that means is that inside ~/Desktop/compciv-2016, there is a hidden folder named .git. You will never have to open that folder or go inside of it, but that's where the magic happens. That's where the Git software stores all of tracking information and metadata for the target file folder. Delete that .git/ subdirectory, and your file folder is no different than it was before.
Adding changes to be tracked by Git
So how does Git "know" that we've made changes to the file folder, and that it should be keeping track of these changes? We have to tell it specifically – there's no autosave-autotrack as you find in modern Word processing software.
So let's make some changes by adding two new files in our compciv-2016 folder:
test.txtfoo.txt
. You can do this via opening up the ~/Desktop/compciv-2016 folder in Sublime Text.
Or, if you're on OS X/Linux, you can also do this using the touch command, which creates empty files (or refreshes their timestamps if they exist):
(assuming you're still in ~/Desktop/compciv-2016):
$ touch test.txt
$ touch foo.txt
Note: You may have other files and folders in compciv-2016 at this point. I'll just assume that it's empty except for test.txt and foo.txt. The existence of other files in that folder does not matter, for our current purpose.
The git status command
The git status command tells us what's going on in the current state of the repo, including what changes have been made, which have been "committed", and other details that will become clearer after we've gotten the hang of things.
For now, at this young state of our repository, git status will tell us how simply how empty our repository is, even though files exist. In other words, even though we've created files inside of compciv-2016, it doesn't mean anything to Git until we've explicitly told Git: "Hey, we want to track these files".
So let's see what Git is currently tracking using the git status command:
$ git status
On branch master

Initial commit

Untracked files:
  (use "git add <file>..." to include in what will be committed)

  foo.txt
  test.txt

nothing added to commit but untracked files present (use "git add" to track)
Again, your compciv-2016 folder may have other files. But pretend for now that only foo.txt and test.txt exist. The response from the git program (which I'll leave lowercased in subsequent mentions) is that there are two untracked files, foo.txt and test.txt, and that we need to use git add to track them.
The git add command
So let's follow that advice and use the git add command to tell git to track the test.txt file. Here's what that looks like:
$ git add test.txt
Executing that command will result in a silent confirmation (unless test.txt doesn't exist). Run git status again to see what's changed:
$ git status
On branch master

Initial commit

Changes to be committed:
  (use "git rm --cached <file>..." to unstage)

  new file:   test.txt

Untracked files:
  (use "git add <file>..." to include in what will be committed)

  foo.txt
That message is a little hard to parse, but here are the important bits:
Changes to be committed:
    new file:   test.txt

Untracked files:
    foo.txt
The foo.txt file remains untracked. But git now knows that test.txt is a "new file" to keep track of.
Let's make an error with git add
Before moving on, let's make a deliberate error with git add by trying to refer to a non-existent file:
$ git add blablbblblabh.TXT
fatal: pathspec 'blablbblblabh.TXT' did not match any files
No harm done. And it should make intuitive sense: Git can only track files that actually exist in the repository.
Committing changes with Git
One of the hardest things to understand about git is the difference between the add and commit commands, as in, why are they two different commands?. Well, the add command tells git to note whatever changes have been made to the repository. Think of commit as telling git to take a snapshot of the current state of currently tracked files in the repository.
$ git commit -m "first change"
First of all, it's worth noting that the git commit command is usually run in tandem with a flag: -m – which is short for, "message". In other words, for every commit/snapshot we make, we're required to include a short descriptive message. Keep it simple and short, and keep it enclosed in quotation marks.
The result of that git commit command will look something like this:
[master (root-commit) 2aae7e8] first change
 1 file changed, 0 insertions(+), 0 deletions(-)
 create mode 100644 test.txt
Virtually none of that needs to be parsed by you, though some of it should make some kind of sense: a single file has been changed (i.e. test.txt has been added into existence). And first change in the first line reflects the message text that I provided via -m "first change".
Use git status to see what's changed. As far as git is concerned, test.txt has already been dealt with and foo.txt is still untracked. We'll deal with foo.txt later.
Now, let's focus on "pushing" our changes to Github.
Syncing our git repository with Github
As I've said earlier, Git and Github are two different things. Everything we've done so far has been with just Git and localized to our own computer, and thus, independent of Github.
But now we want to move our compciv-2016 repository to the "cloud", and Github is currently one of the most popular services for doing so.
Switch out of your command-line (but don't close it yet) and into your browser. The first steps with Github are no different than signing up and creating things via any web service.
How to create a new repo on Github.com
I'm assuming you've already created an account on Github and have your own username. For the purposes of demonstration, I've created a Github account with the username of: some-student.
This means that the account homepage for some-student is at the following URL:
https://github.com/some-student
Your own account follows the same convention, with your account name instead of some-student, of course.
After you have logged in to Github, you can create a new Github repo by going to this URL: https://github.com/new
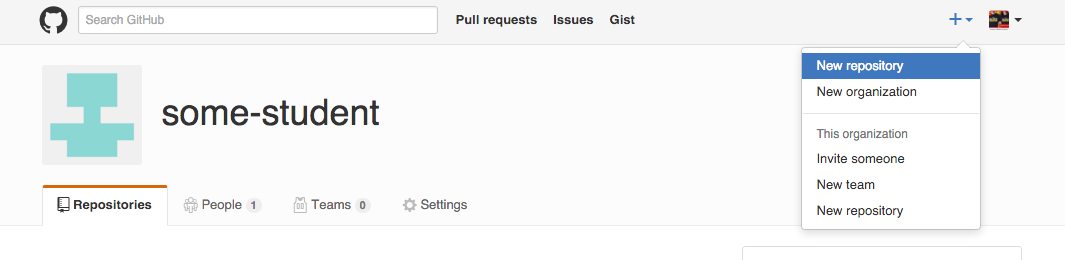
Or, if you prefer the button-clicky way (keeping in mind that Github's layout could change): Look for the plus sign in the top right of your Github homepage. Click it to reveal a dropdown menu, then select New repository:
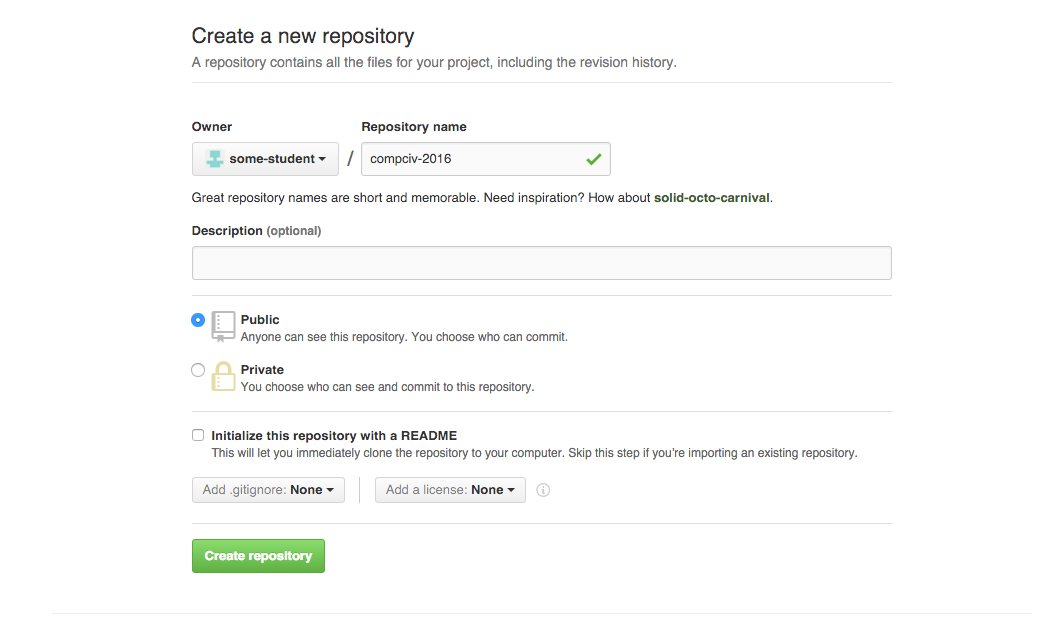
Name and create the repository
In the Repository name, type in the name of our desired repo:
compciv-2016
You can ignore the other options for now. Just click the green button, Create repository:
Upon creation of the repository, you'll be taken to a screen with suggested steps to "create a new repository on the command line" or "push an existing repository from the command line". We will be doing the latter but you don't have to worry about copying the suggested code, as I'll provide the commands and some explanation of them in the next section.
For reference's sake, the URL to your Github repository for compciv-2016 should be:
https://github.com/some-student/compciv-2016
Visiting it now will reveal that it is empty. That will change after we've completed the syncing process.
Syncing our local git repository with the Github repository
At this point, we've created a Git repository in the compciv-2016 folder of our computer. We've also created a Git repository of that same name on Github, using Github's web interface.
But we've done nothing to actually connect the two repositories, besides give them the same name. Which literally means nothing to anyone, anywhere. compciv-2016 is just a name we made up for two different repositories. And they are physically different in the most obvious ways: for example, our local version of compciv-2016 has the file test.txt in it, whereas our Github version of compciv-2016 is empty.
We want the Github repository of compciv-2016 to be the "canonical" repository, i.e. it contains the "official" state of our repository. However, it is "behind" the Git repository on our own computer, so we will fix that in this section.
Setting the "origin" of your repository
Switch back to your Terminal and to your local compciv-2016 repo, e.g. your ~/Desktop/compciv-2016 folder. Run pwd and git status to make sure you're at the right place.
Then, run this command, which is a command you should only have to run once for the normal lifetime of a project – make sure to replace some-student with your own Github account name
$ git remote add origin git@github.com:some-student/compciv-2016.git
Again, this is a command you should only have to run once – unless your computer gets wiped out and you have to re-download/re-create the repository – so I won't bother explaining it in detail. That descriptor, origin, is somewhat notable, in that this git remote command establishes github.com:some-student/compciv-2016.git as the "origin" repository, i.e. the canonical repository.
If the command works, you should get no feedback from the command line. If you get an error, please email me before continuing.
Pushing your changes to the origin
Now is the time to push the changes that we made in our local repository, i.e. the addition and committing of test.txt.
The command for that is git push; however, with this being our very first "push" from local repository to the "origin" repository on Github, we have to add a couple of parameters this one time only:
$ git push -u origin master
At this point, you'll probably be prompted for your Github username and password, because you are effectively making changes to the content hosted by Github under your account. Again, type in your Github username and password (not your computer username and password).
And provided everything is correctly set up, git will describe what was pushed and how long it took – mostly details that you can ignore:
Counting objects: 3, done.
Writing objects: 100% (3/3), 206 bytes | 0 bytes/s, done.
Total 3 (delta 0), reused 0 (delta 0)
To git@github.com:some-student/compciv-2016.git
 * [new branch]      master -> master
Branch master set up to track remote branch master from origin by rebasing.
Go to the homepage for your Github repository, e.g. the URL below, except with your Github username instead of some-student:
https://github.com/some-student/compciv-2016
It should look something like this:
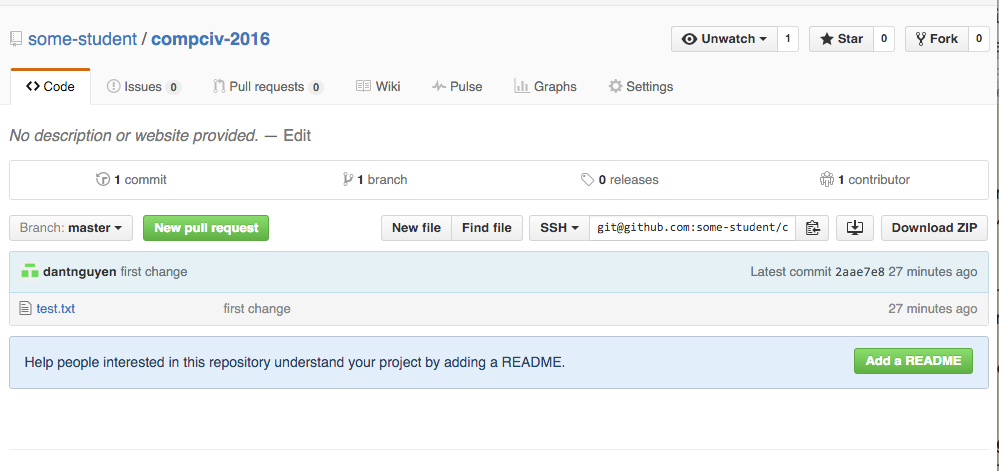
Take special note of test.txt and the commit message (first change).
Congrats, you've created a Git repository and synced it online with Github!
Making more additions and changes to our synced repo
Now that we've turned our compciv-2016 folder into a Git repository, then created a synced copy on Github, let's review the whole add, commit, push cycle.
Get back to your command-line prompt and into your compciv-2016 folder. If you've done what I've done so far, type git status:
$ git status
On branch master
Your branch is up-to-date with 'origin/master'.
Untracked files:
  (use "git add <file>..." to include in what will be committed)

  foo.txt

nothing added to commit but untracked files present (use "git add" to track)
Remember ol' foo.txt? We never officially added it to the repository. Let's do that now:
$ git add foo.txt
Run git status again if you're unsure of what the result is.
Now, let's commit this change, with whatever message you please:
$ git commit -m "foo is fun"
[master 5bc4217] foo is fun
 1 file changed, 0 insertions(+), 0 deletions(-)
 create mode 100644 foo.txt
Again, run git status to see what's changed.
And now, push it to Github. This time, you should only have to type git push; you shouldn't have to include -u origin master – however, you probably will have to re-enter your Github username and password:
$ git push
Counting objects: 2, done.
Delta compression using up to 4 threads.
Compressing objects: 100% (2/2), done.
Writing objects: 100% (2/2), 232 bytes | 0 bytes/s, done.
Total 2 (delta 0), reused 0 (delta 0)
To git@github.com:some-student/compciv-2016.git
   2aae7e8..5bc4217  master -> master
Now, jump back to the Github page for your repository, e.g. https://github.com/some-student/compciv-2016, to see the change:

Add-commit-push-again: Now with folders
OK, let's repeat the process. But first, let's make some new changes to track:
-
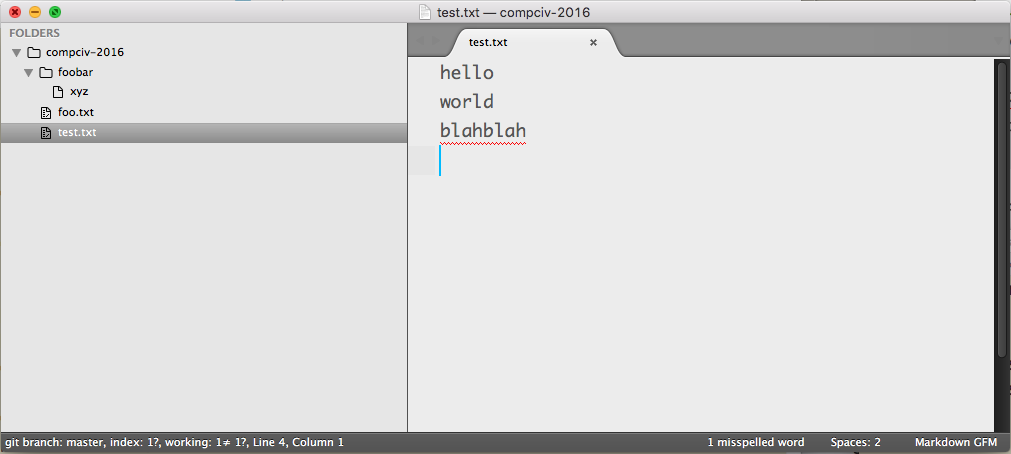
Add a bunch of text to
test.txtand Save the file (via Sublime Text), e.g.:hello world blahblah - Create a new sub-directory named
foobar/, i.e.compciv-2016/foobar - Inside
foobar/, create a new file namedxyz, i.e.compciv-2016/foobar/xyz– you can leave it empty
Again, your compciv-2016 may have more files/folders, but at the minimum, it should look like this:
Now run git status:
$ git status
On branch master
Your branch is up-to-date with 'origin/master'.
Changes not staged for commit:
  (use "git add <file>..." to update what will be committed)
  (use "git checkout -- <file>..." to discard changes in working directory)

  modified:   test.txt

Untracked files:
  (use "git add <file>..." to include in what will be committed)

  foobar/

no changes added to commit (use "git add" and/or "git commit -a")
Note the two divisions of changes: the first section are currently-tracked files that have been modified. The bottom section lists non-tracked files/folders (it doesn't bother listing foobar/xyz since foobar/ is untracked).
Let's add the foobar folder then commit it:
$ git add foobar
$ git commit -m 'a fun new folder'
Before you push it, visit the Github repo webpage and see what it looks like. Does the foobar/ folder appear? Did you expect it to?
The answer to both of those questions should be No. Without a push command, our git add and git commit commands aren't known by the Github-hosted repo. To be honest, you'll be doing add/commit/push in such quick succession for most of your changes that this distinction probably won't matter much, practically speaking. But it's worth noting, again, that git is not Github – and the two do not talk to each other until we explicitly make it so.
(You'll obviously want to be aware of this if you ever use Git and Github in a professional/team environment)
OK, so let's sync up the repos with a git push:
$ git push
I'll spare you the resulting output. Here's what my Github repo looks like:
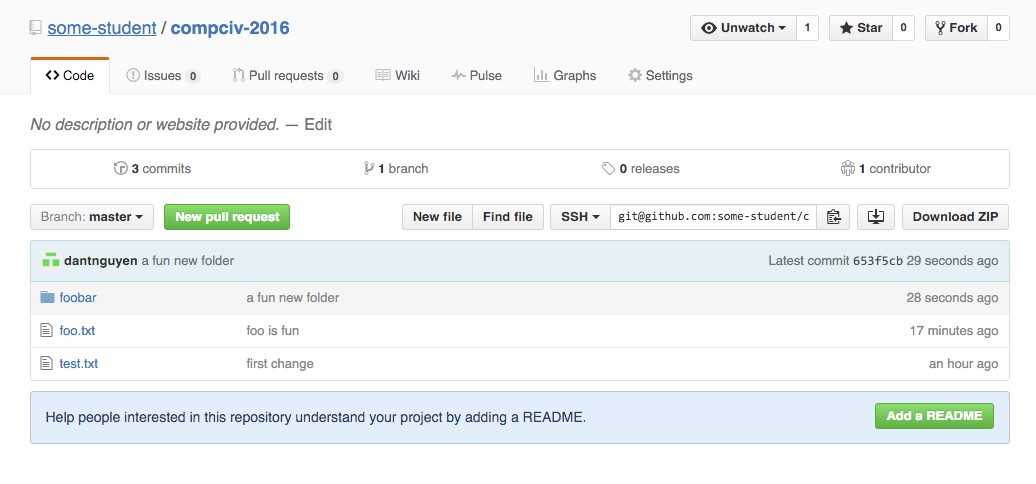
Even though we made changes to test.txt (i.e. added a few lines of text to it), they weren't pushed because we never added them. Git does not assume that every change you make – such as editing/adding/removing files – are changes that you want to commit to.
Let's change that – again, use git status between add, commit. and push to see details of what's going on – but as you get comfortable, the add/commit/push sequence becomes routine:
$ git add test.txt
$ git commit -m 'some more changes'
$ git push
Deletions are additions too
The command git add makes it seem that it just handles the occasions when files are added to a file folder. However, git add does not track additions, necessarily; it tracks (i.e. _adds) any kind of change to a repository, including when files are removed.
Delete foo.txt and the foobar/ subdirectory from the compciv-2016 repository. You can do this the "old-fashioned" way by going into your graphical operating system and dragging those files into the "Trash" or "Recycle Bin".
Then return to your local compciv-2016 repository via the command-line and run git status:
$ git status
On branch master
Your branch is up-to-date with 'origin/master'.
Changes not staged for commit:
  (use "git add/rm <file>..." to update what will be committed)
  (use "git checkout -- <file>..." to discard changes in working directory)

  deleted:    foo.txt
  deleted:    foobar/xyz

no changes added to commit (use "git add" and/or "git commit -a")
Deletions are just like any other change to the repository. You can add these changes as if they were like any other (note that Tab autocomplete won't work):
$ git add foo.txt
$ git add foobar/xyz
Then commit and push as before:
$ git commit -m 'bye bye files'
$ git push
Seeing the log of our changes
So we've done all these git add/commit/push commands – but where is the evidence that it's actually tracking each change? Hopefully, you won't run into a situation (at least, early on) in which you need to revert to a previous commit. But to see the commits (i.e. the snapshots) you've made so far, you can run the git log command, which will list each commit in reverse chronological order:
$ git log
commit bc9db01bc56d37d497a240f0b06d467d4653f2c0
Author: dantnguyen <dan@danwin.com>
Date:   Mon Jan 11 00:57:46 2016 -0800

    bye bye files

commit be25b226fc90e5722d0a262666a62d74ae621f72
Author: dantnguyen <dan@danwin.com>
Date:   Mon Jan 11 00:50:45 2016 -0800

    some more changes

commit 653f5cb86b6d7e5ba0a8732919b3b414c7f6b72f
Author: dantnguyen <dan@danwin.com>
Date:   Mon Jan 11 00:46:36 2016 -0800

    a fun new folder

commit 5bc42175a385a9012996277fc0258548b9c831a4
Author: dantnguyen <dan@danwin.com>
Date:   Mon Jan 11 00:30:14 2016 -0800

    foo is fun

commit 2aae7e81289c8655f7479d0e7419a7f10fc21d27
Author: dantnguyen <dan@danwin.com>
Date:   Sun Jan 10 23:54:12 2016 -0800

    first change
Setting up .gitignore
Before moving on to the next section on "conveniences", let's set up a .gitignore file. The .gitignore file is a hidden text file that, by convention, lists the kinds of files that we don't want to include in our Git repositories (either offline or online on Github). Think of it as a blacklist to prevent unwanted files from being part of the repository history, either common junk files or very sensitive files, i.e. files that contain passwords.
In Sublime Text, create the .gitignore file in the compciv-2016 folder. In other words, if your compciv-2016 folder is inside ~/Desktop, the full path to it would be:
~/Desktop/compciv-2016/.gitignore
(Do not mess up the spelling!)
Then add the following lines (it's OK to copy and paste them) and save the file:
.DS_Store
creds_*
tempdata/
__pycache__/
*.py[cod]
Then, add/commit/push:
$ git add .gitignore
$ git commit -m 'adding gitignore'
$ git push
Throughout the homework and projects for this class, we'll be making use of files that begin with creds_ to store passwords. These should never be tracked by the Git repository – otherwise, they would get pushed onto the online Github repository. And remember – Github is online. That's what makes it convenient to use. But very dangerous when dealing with sensitive data.
Subsequent homework assignments will have you creating files that begin with creds_ and also, downloading data files into tempdata/. This .gitignore file will keep those files from accidentally being pushed online.
Note: If you do accidentally commit and push something online that you didn't want to push online, please email me immediately, and I can walk you through the steps. As you can imagine, the history-tracking conveniences that Git provide also mean that deleting history from a repository is more complicated than just deleting files.
After committing/pushing that .gitignore file, test it by creating a new empty file named creds_twitter_password.
Then run git status – if your .gitignore file was written correctly, creds_twitter_password.txt should not show up anywhere on git status – the git software should know to never track it for any purpose, at this point.
To drive home the point, create a file named: credstwitterpassword.txt. Running git status should list credstwitterpassword.txt as an untracked file, because the pattern in .gitignore is for creds_* – i.e. files that begin exactly as creds_, which credstwitter... does not.
Smoothing out the workflow
Now that we've gotten the basic cycle of git operations down, let's add a few conveniences.
Using the --all option for git add
We don't have to git add files one-by-one, we can add all changes with the --all flag:
$ git add --all
I use this 99% of the time, but you may want to be careful for your first several dozen add/commit/push cycles. That is, run git status to make sure you won't be adding anything to the repo that you don't want to actually add.
Here's out to test out this command in action:
- Add two subdirectories,
apples/andoranges/ - Add a bunch of random files in those directories, e.g.
apples/hello.txtandoranges/world.txt
Instead of adding them one-by-one, you can add them all with git add --all – then commit and push as before:
$ git add --all
$ git commit -m "a bunch of apples and oranges"
$ git push
This applies to changes that are deletions, of course: delete all those unnecessary files, then add, commit, and push the changes:
$ git add --all
$ git commit -m 'whatev'
$ git push
Automatically authenticating yourself with Github
Do you find it annoying to retype your username and password with each push to Github? You should – pushing to Github should feel as natural as saving a file in any other workflow. having to re-authenticate yourself means you'll either be pushing much less frequently than you should. Or even worse: you'll choose a simple password that is easy to crack.
Follow Github's instructions on how to cache/save your Github credentials in your local Git configuration – it has separate instructions for each operating system: Caching your GitHub password in Git
If you're successful, git push should work automatically without prompting you for your username or password.